Thursday, October 14, 2010
OmmWriter Plug
Just wanted to plug this fantastic software for the Mac. OmmWriter. Writing is a painful excercise for me since I get distracted pretty easily. With so many application like IDEs, chat, mail, brower, twitter etc. open its really hard to concentrate. When I try to write about any topic, I always have a tendency to fact check every sentence, which takes me on reading tangents. OmmWriter runs in full-screen mode and removes any sort of notification. I can write with purpose and bang out a blog post really quickly. Give these guys a try, their version 1 is free and the newest one is a paid version.
Wednesday, October 13, 2010
Terracotta BigMemory: A tale of eating our own code
Terracotta (The company I work for) recently came out with a beta release for their BigMemory product. Our claim is that if you use Ehcache BigMemory then those GC problems go away. If you don't know what Ehcache or Terracotta is you can find out here.
This is far from just a claim, we didn't simply didn't write BigMemory, ran a few tests, and release the Beta. We took BigMemory and freed our own Terracotta Server for GC constraints that most Java server product have.
So what exactly did we do? In Terracotta we keep a representation of distributed objects in your server. For our clustered Ehcache product we keep a representation of cache segments and cache entries on the server. As the cache grows, we need to keep track of the keys associated with the cache segment, as well as have more cache entries representations on the server. The Terracotta Server has the ability to flush cache entries to disk when we detect memory pressure on our server. and fault in objects when cache entries are needed.
To accommodate the keys on the server, you had two options. One is the increase heap so that more keys could fit on the server. The second is to add additional Terracotta Servers to the cluster so that the segments (and their keys) are distributed to among many servers.
Adding more heap threw us into the classic GC problem. Once you start getting into heap sizes of 5-6GB, you start seeing 5-8 second GC pauses. Adding stripes solves the problem and worked for our customers as well.
But we found a pattern emerging. Customers were purchasing huge boxes (I'm going regret saying huge a few months from now ), 32 GB ram and 16 cores of processing power. They were like "We want to run your servers on this thing." And they did what everyone does for Java Servers, they basically run multiple JVMs (if possible) on the same box and deal with the added complexity and unpredicatability and probably says a prayer or two. I'm sure you all understand what I mean by complexity, but what do I mean by unpredictability. Lets say you run your servers with small heaps and your getting a 2 second GC, but will so many JVMs, how do you know your GCs will not be staggered. Meaning if you had 16 processes running and they GCed one after the other. That is a 32 second pause. Get the picture?
We figured, there must be a better way. So we built BigMemory and put it in our server. Now you can take our pure Java Terracotta Server, have it use that 32 GB ram and still get less than 1 second pauses. Practically No GC.
For anyone who spent countless hours like I have tuning GC is going to love this. We ran and messed around with every knob the Sun (now Oracle) gave use to tune GC. When we put in BigMemory, we just deleted all those settings. Our heap is small enough so that default Java settings are good enough!
End result? Our Terracotta Server with BigMemory enabled can achieve higher density will less servers and best of all you can get predictable latency out of them.
Check out BigMemory and let me know if it works just as well for you.
Wednesday, February 17, 2010
automagically cluster Lift web sessions with Terracotta
Lift Web Framework Is a MVC Framework written in Scala, Which are two things I know exactly nothing about. Being that, I thought It would be a good example to show how easy it is to cluster web session using terracotta new express web session product. Here's a link to our Beta ...
Now you got yourself a fully functioning hello world webapp. Let's add some code where we are actually saving and displaying session data.
Now start our terracotta server, download here
Start are terracotta server and then run the jetty servers again. this time you can see session data on entered in on one server appear on the other.
Part 1: The Lift/Scala Thing...
So first I had to figure out what the deal with Lift is about. Good thing there's a fairly simple tutorial to create a basic HelloWorld lift webapp here. First let's download and install all the bits you need to write a Lift web app, fortunately for me it was just the Scala Eclipse Plugin.
Let us create a maven project:
mvn archetype:generate -U \
-DarchetypeGroupId=net.liftweb \
-DarchetypeArtifactId=lift-archetype-blank \
-DarchetypeVersion=1.0 \
-DremoteRepositories=http://scala-tools.org/repo-releases \
-DgroupId=com.examples.terracotta \
-DartifactId=clusteredCounter \
-Dversion=1.0-SNAPSHOT

cd clusteredCounter
mvn jetty:run
Now you got yourself a fully functioning hello world webapp. Let's add some code where we are actually saving and displaying session data.
add a Lift Snippet that would process url parameters add then to the session and then display all the session attributes:
package com.examples.terracotta.snippet

import javax.servlet.http._
import net.liftweb.http._
import net.liftweb.util._
import net.liftweb.util.Helpers._

import net.liftweb.http.SessionVar
import scala.collection.mutable.HashMap
import scala.xml._
import java.util.Enumeration
import scala.collection.mutable.HashSet

class ViewSubmission {


def showStuff : NodeSeq = {

var title = S.param("title").openOr("")
var url = S.param("url").openOr("")

S.servletSession.get.setAttribute(title, url)

var e = S.servletSession.get.getAttributeNames
val names = new HashSet[String]
while (e.hasMoreElements()) {
 val name = e.nextElement().asInstanceOf[String]
 names += name
 println(names)
}

<table> {
   for (name <- names) yield
     <tr>
      <td>Title</td>
      <td>{name}</td>
     </tr>
     <tr>
      <td>Url</td>
      <td>{S.servletSession.get.getAttribute(name)}</td>
     </tr>
}</table>

}

}
Edit the index.html to show edit and show session data:
<lift:surround with="default" at="content">
<table>
<lift:snippet type="viewSubmission:showStuff" />
</table>
<form>
<tr>
<td>Title</td>
<td>
<input type="text" name="title" />
</td>
</tr>
<tr>
<td>Url</td>
<td>
<input type="text" name="url"/>
</td>
</tr>
<tr>
<td> </td>
<td><input type="submit" value="Add" /></td>
</tr>
</form>
</lift:surround>
Run mvn -Djetty.port=9999 jetty:run and another instance with
mvn -Djetty.port=9999 jetty:run. got to http://localhost:8888 and http://localhost:9999. you can only see the data you added to each local web session.
Now the fun part...
Part 2: Clustering the web session
First we need to add our express web session jar to the pom.xml as a dependency:
<dependency>
<groupid>org.terracotta.session</groupid>
<artifactid>terracotta-session</artifactid>
<version>1.1.0-SNAPSHOT</version>
</dependency>

and also Terracotta Maven Repo information..

<repository>
<id>terracotta-snapshots</id>
<url>http://www.terracotta.org/download/reflector/maven2</url>
<releases>
  <enabled>true</enabled>
</releases>
<snapshots>
  <enabled>true</enabled>
</snapshots>
</repository>
Let us add our terracotta filter for clustering:
<filter>
 <filter-name>terracotta</filter-name>
 <display-name>Terracotta Session Filter</display-name>
 <!-- The filter class is specific to the application server. -->
 <filter-class>org.terracotta.session.TerracottaJetty61xSessionFilter</filter-class>
 <init-param>
  <param-name>tcConfigUrl</param-name>
  <!--
   <param-value> of type tcConfigUrl has a <param-value> containing the
   URL or filepath (for example, /lib/tc-config.xml) to tc-config.xml.
  -->
  <param-value>localhost:9510</param-value>
 </init-param>
</filter>

<filter-mapping>
 <filter-name>terracotta</filter-name>
 <url-pattern>/*</url-pattern>
</filter-mapping>
Now start our terracotta server, download here
Start are terracotta server and then run the jetty servers again. this time you can see session data on entered in on one server appear on the other.
Sunday, June 28, 2009
Performance Tuning Hibernate Second-level Cache
Lately I've been spending ALOT of time performance testing and tuning of a hibernate app using a Terracotta implementation of Hibernate Second-level Cache. I thought it would be interesting to do a series of posts that walk through different use-cases and how we performance tuned them. While doing so, I thought it would also interesting to demonstrate various tools that can help with the tuning.
Before we continue, I think it is worth while to read my colleagues posts on performance testing here, here, and here. Their advice seems simple enough. But trust me, it's really easy to fall off the wagon when it comes to this stuff. The work itself is very tedious, so it's easy to convince yourself that "Yeah, this patch is it, this is the final run", or "I know the bottleneck is the CPU for sure! Why bother looking at the memory and/or disk characteristics." Assumptions and unfounded optimism can easily get you rat-holed to a dead end. Bottom line: don't assume anything and collect everything.
The project that we are going to look at is a simple hibernate app. The app itself just warms up the 2nd-level cache and then accesses the cache, and depending on the use case writes, in a non-partitioned fashion in the following modes: read-only, read-mostly and read-write.
the various tools I used to tune is:
- nmon a basic tool to look at cpu, memory, disk and network metrics.
- jmap,jhat,jstat to analyze heap and garbage collector metrics, these tools are included in the jdk.
- VisualVM, very cool tool to look at JMX Beans, nmon type characteristics as well as a light-weight thread monitoring tool.
- Terracotta Dev Console, great tool for looking at terracotta specific characteristics as well as general info (cpu, memory etc.)
- Good old fashion thread dumps (kill -3 java_pid)
Ok, so that's our test and tools. More of the nitty-gritty to come :)
Tuesday, June 23, 2009
Carrying over Eclipse Plugins from Ganymede to Galileo
Looks like a new version of Eclipse is coming out!
Over the course of using Ganymede I accumulated various plugins that I want to carry over to Galileo. I figure there must be a way to export and then import those plugin Urls.
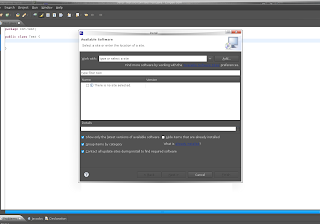
So first I launched my Ganymede and go to Help-> Software Updates..
Then click "Manage Sites.." You should see the following Dialog:
Click the checkboxes for which site Urls you want to export and Click "Export" and same the file. I saved the suggested bookmarks.xml to my Desktop.
Now I downloaded the Galileo RC4 (Galileo final release comes out tommorrow) and launched it.
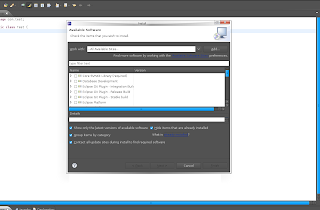
Now go to Help->Install New Software..
Click on the link "Available Sofware Sites" like the one in the screenshot below:
Then select Import and select the file you saved from Ganymede. Now make sure you have "Hide items that are already installed" Otherwise it will take a long time to come up with the plugin list.
Now just install the plugins you want to install. Can't make any promises that it will actually work with Galileo :)
Over the course of using Ganymede I accumulated various plugins that I want to carry over to Galileo. I figure there must be a way to export and then import those plugin Urls.
So first I launched my Ganymede and go to Help-> Software Updates..
Then click "Manage Sites.." You should see the following Dialog:

Click the checkboxes for which site Urls you want to export and Click "Export" and same the file. I saved the suggested bookmarks.xml to my Desktop.
Now I downloaded the Galileo RC4 (Galileo final release comes out tommorrow) and launched it.
Now go to Help->Install New Software..
Click on the link "Available Sofware Sites" like the one in the screenshot below:

Then select Import and select the file you saved from Ganymede. Now make sure you have "Hide items that are already installed" Otherwise it will take a long time to come up with the plugin list.

Now just install the plugins you want to install. Can't make any promises that it will actually work with Galileo :)
Sunday, June 21, 2009
Terracotta Cluster Events: A simple example
My friend instant messaging me this weekend about this app he is writing using Terracotta. He is concerned about when a node leaves/joins and terracotta cluster and was doing some really weird stuff with the JVM Shutdown hook. I decided to do a quick blog post about Terracotta Clustered Events which is a simple way for an app to listen for terracotta cluster wide events.
So first i'll generate a new project using the pojo-archetype:
The the following prompt appears:
Now enter in a description, I typed in "This is an example project to demonstrate java clustered api" and then was prompted again and Typed in "Y"
Now we have a project to test out terracotta clustered api.
The clustered event api interfaces are available from the terracotta api jar, let's include that in our pom.xml
Change the process class to have a count of 4, so we run 4 nodes from our tests.
Now that we have our app I want it to be clustered aware. In this example, I'm not going to do anything interesting except print out when node's joins and leaves. So I added the following listener and implementation to my existing App class:
And then call registerListener from the main() function:
now run the app with the following command to see the node events
Much much more simpler then registering ShutDown hooks. The project is here
So first i'll generate a new project using the pojo-archetype:
mvn org.apache.maven.plugins:maven-archetype-plugin:2.0-alpha-5:generate \
-DarchetypeGroupId=org.terracotta.maven.archetypes \
-DarchetypeArtifactId=pojo-archetype \
-DarchetypeVersion=1.5.0-SNAPSHOT \
-DgroupId=org.terracotta.examples \
-DartifactId=clusteredapi-examples \
-Dversion=1.0.0 \
-DremoteRepositories=http://www.terracotta.org/download/reflector/maven2
The the following prompt appears:
[INFO] Scanning for projects...
[INFO] ------------------------------------------------------------------------
[INFO] Building Maven Default Project
[INFO]    task-segment: [org.apache.maven.plugins:maven-archetype-plugin:2.0-alpha-5-parent-patch-SNAPSHOT:generate] (aggregator-style)
[INFO] ------------------------------------------------------------------------
[INFO] Preparing archetype:generate
[INFO] No goals needed for project - skipping
[INFO] Setting property: classpath.resource.loader.class => 'org.codehaus.plexus.velocity.ContextClassLoaderResourceLoader'.
[INFO] Setting property: velocimacro.messages.on => 'false'.
[INFO] Setting property: resource.loader => 'classpath'.
[INFO] Setting property: resource.manager.logwhenfound => 'false'.
[INFO] [archetype:generate]
[INFO] Generating project in Interactive mode
[INFO] Archetype repository missing. Using the one from [org.terracotta.maven.archetypes:pojo-archetype:1.5.0-SNAPSHOT] found in catalog local
[INFO] Using property: groupId = org.terracotta.examples
[INFO] Using property: artifactId = clusterapi-example
[INFO] Using property: version = 1.0.0
[INFO] Using property: package = org.terracotta.examples
Define value for property 'description': :
Now enter in a description, I typed in "This is an example project to demonstrate java clustered api" and then was prompted again and Typed in "Y"
Now we have a project to test out terracotta clustered api.
The clustered event api interfaces are available from the terracotta api jar, let's include that in our pom.xml
<dependency>
           <groupid> org.terracotta.api</groupid>
           <artifactid>api</artifactid>
           <version>1.0.0</version>
</dependency>
Change the process class to have a count of 4, so we run 4 nodes from our tests.
<plugin>
            ...
                <processes>
                    <process nodename="app" count="4" jvmargs="-Xmx20m">
                        <classname>org.terracotta.examples.App
                        </classname>
                    </process>
               </processes>
</plugin>
Now that we have our app I want it to be clustered aware. In this example, I'm not going to do anything interesting except print out when node's joins and leaves. So I added the following listener and implementation to my existing App class:
public class App implements DsoClusterListener {

   @InjectedDsoInstance
private DsoCluster cluster;

public void registerListener() {
    this.cluster.addClusterListener(this);

}

...
public void nodeJoined(DsoClusterEvent dsoclusterevent) {
    System.out.println("nodeJoined Event about node: " + dsoclusterevent.getNode());
}

public void nodeLeft(DsoClusterEvent dsoclusterevent) {
    System.out.println("nodeLeft Event about node: " + dsoclusterevent.getNode());
}

public void operationsDisabled(DsoClusterEvent dsoclusterevent) {
    //;
}

public void operationsEnabled(DsoClusterEvent dsoclusterevent) {
    //
}
And then call registerListener from the main() function:
App app = new App();
app.registerListener();
app.addMessage("Hello, world");
now run the app with the following command to see the node events
mvn clean install
mvn tc:run
Much much more simpler then registering ShutDown hooks. The project is here
Saturday, June 20, 2009
Terracotta Integration Module with Maven
TIMs or Terracotta Integration Module is a way to package classes and configuration for certain interfaces and products so that you can add terracotta clustering without much effort. For example, we have a TIM for ehcache so that anyone who uses ehcache can get terracotta clustering just by including the TIM http://forge.terracotta.org/releases/projects/tim-ehcache/
Sometimes using archetypes in maven is a bit unweilding, so first we are going to check out the correct versions and make sure everything is in place.
Let's check out the maven-archetype-plugin first:
Now we want to checkout and install the tim-archetype plugin, is is what builds the directory structure and configuration for our TIM project.
To create a TIM project you need to run the following command:
this will prompt you to run the following command:
Hit enter or type in the package name you desire and hit enter.
Type in 'Y' to finish creating a newly minted TIM.
All set to go!
Sometimes using archetypes in maven is a bit unweilding, so first we are going to check out the correct versions and make sure everything is in place.
Let's check out the maven-archetype-plugin first:
svn co http://svn.apache.org/repos/asf/maven/archetype/tags/maven-archetype-2.0-alpha-4/ maven-archetype-2.0-alpha-4
cd maven-archetype-2.0-alpha-4
mvn clean install
Now we want to checkout and install the tim-archetype plugin, is is what builds the directory structure and configuration for our TIM project.
svn co http://svn.terracotta.org/svn/forge/projects/tim-archetype/trunk/ tim-archetype
cd tim-archetype
mvn clean install
To create a TIM project you need to run the following command:
mvn org.apache.maven.plugins:maven-archetype-plugin:2.0-alpha-4:generate \
  -DarchetypeGroupId=org.terracotta.maven.archetypes \
  -DarchetypeArtifactId=tim-archetype \
  -DarchetypeVersion=1.5.0-SNAPSHOT \
  -DremoteRepositories=http://www.terracotta.org/download/reflector/maven2 \
  -DgroupId=org.terracotta.modules.memcached \
  -DartifactId=tim-memcached \
  -Dversion=1.0.0
this will prompt you to run the following command:
[INFO] Using property: groupId = org.terracotta.modules.memcached
[INFO] Using property: artifactId = tim-memcached
[INFO] Using property: version = 1.0.0
Define value for property 'package':  org.terracotta.modules.memcached.tim-memcached: :
Hit enter or type in the package name you desire and hit enter.
Define value for property 'package':  org.terracotta.modules.memcached.tim-memcached: :
Confirm properties configuration:
groupId: org.terracotta.modules.memcached
artifactId: tim-memcached
version: 1.0.0
package: org.terracotta.modules.memcached.tim-memcached
 Y: :
Type in 'Y' to finish creating a newly minted TIM.
All set to go!
Subscribe to:
Posts (Atom)